How to Start Selling on Amazon FBA A Practical Guide
So you’re ready to jump into the world of Amazon FBA. Great. The first thing to understand is that it’s more than just finding a product and throwing it online. It's about building a real business, and that starts with a solid foundation. We're talking about the nuts and bolts: getting your business structure right, setting up your Seller account, and picking the right plan for your goals.
The goal is to scale without dubious shortcuts and without hurting your credibility.
This is the stuff many new sellers rush through in their excitement, but getting it right from the start will save you a world of headaches later on. Let's walk through it.
Building Your FBA Business Foundation
Before you even think about product research tools or shipping logistics, you need to handle the legal and operational setup. This isn't the glamorous part, I know, but it’s absolutely non-negotiable for protecting yourself and positioning your business to actually grow.
Getting Your Business Structure Right
Your first big decision is how to structure your business legally. It's tempting to just start as a Sole Proprietorship because it's easy—there's virtually no setup. The problem? There's absolutely no legal separation between you and the business. That means if something goes wrong and your business gets sued, your personal assets like your house or car could be on the line.
That’s why most serious sellers go with a Limited Liability Company (LLC). It does exactly what the name implies: it limits your liability. An LLC creates a legal wall between your personal and business finances, offering a crucial layer of protection. Yes, it takes a bit more paperwork and a small fee to set up, but the peace of mind is worth every penny.
Setting Up Your Amazon Seller Account
Once your legal entity is ready, it's time to register for an account on Amazon Seller Central. Think of this as your mission control for everything—your listings, inventory, sales data, customer messages, and advertising all live here.
To get through the registration process, you'll need to have a few documents handy:
- Your business name, address, and contact info
- A government-issued ID (like a driver's license or passport)
- A recent bank or credit card statement for verification
- Your tax information (your Social Security Number if you’re a sole proprietor, or an Employer Identification Number for an LLC)
- A credit card that Amazon can charge for fees
During sign-up, you'll hit a fork in the road where you have to choose a selling plan. This choice directly impacts your monthly costs, so it’s important to understand the difference.
My Two Cents: Don't treat this setup phase like it's just a bunch of forms. The choices you make right now—from your business structure to your selling plan—will directly affect your liability, your profitability, and how easily you can scale. Get it right now, and thank yourself later.
Choosing Your Selling Plan: Individual vs. Professional
Amazon gives you two main options, and the right one for you really boils down to how many products you plan on selling each month.
To make it simple, I've put together a quick comparison to help you decide.
Amazon Selling Plan Comparison Individual vs Professional
| Feature | Individual Plan | Professional Plan |
|---|---|---|
| Monthly Fee | $0 | $39.99 |
| Per-Item Fee | $0.99 per item sold | None |
| Best For | Beginners selling <40 items/month | Businesses selling >40 items/month |
| Advertising | No | Yes (Amazon PPC) |
| Buy Box Eligibility | No | Yes |
| Advanced Tools | No (e.g., bulk uploads, reporting) | Yes |
| Restricted Categories | No | Yes (application required) |
The Individual plan is great if you're just dipping your toes in the water. You pay $0.99 for every single item you sell, but there's no monthly subscription fee. If you're planning to sell fewer than 40 items a month, this is your most cost-effective route.
The Professional plan, on the other hand, is a flat $39.99 per month, but that $0.99 per-item fee disappears. Do the math: if you sell more than 40 units, this plan immediately starts saving you money. More importantly, it unlocks the tools you absolutely need to be competitive. We’re talking about the ability to run ads, win the coveted Buy Box, access detailed sales reports, and sell in gated product categories.
Honestly, if you're serious about building a real FBA business, the Professional plan is the only way to go. As your brand grows, you'll also need to protect it. It’s a good idea to learn early how to fight trademark infringement on Amazon to safeguard the brand you’re working so hard to build.
How to Find a Profitable Product
Let’s be honest: your success on Amazon hinges almost entirely on the product you choose to sell. This isn't the time to go with your gut or pick something you personally think is cool. It's about finding an item with proven, data-backed demand.
Your goal is to find that sweet spot. You want a product with enough demand to drive consistent sales but not so much competition that you're buried by sellers with thousands of reviews. This hunt for the perfect product is the single most important skill you'll develop as a seller.
Choosing Your FBA Business Model
Before we get into the weeds of research, you need to understand the different ways to sell on Amazon. Each path has its own sourcing strategy, investment level, and effort required.
- Private Label: This is where you build your own brand from scratch. You find a generic product—often from a manufacturer on a site like Alibaba—and then apply your own logo, branding, and custom packaging. This model has the highest profit potential, but it also demands the most upfront capital and work.
- Wholesale: With this approach, you buy existing, well-known branded products in bulk directly from the manufacturer or a distributor. You're basically piggybacking on their brand recognition, which means less marketing legwork for you, but the profit margins are usually thinner.
- Arbitrage (Retail & Online): This is the classic "buy low, sell high" model. You hunt for discounted products in retail stores (Retail Arbitrage) or on other websites (Online Arbitrage) and flip them on Amazon for a profit. It's the lowest-risk way to get started, but it’s a grind and not easily scalable.
For anyone serious about building a real, long-term business, Private Label is usually the way to go. It gives you total control over your brand, your listing, and your destiny on the platform.
Using Tools for Data-Driven Decisions
Trying to find a winning product by just browsing Amazon is like looking for a needle in a digital haystack. The marketplace is just too massive. This is where specialized product research tools become your secret weapon.
Tools like Helium 10 and Jungle Scout are the industry standard for a reason. They plug directly into Amazon's data, letting you see what's really happening behind the scenes. Instead of guessing, you can analyze hard numbers: monthly sales volume, revenue trends, keyword search volume, and the real level of competition in any niche.
These tools let you filter through millions of products to find a handful of gems that meet your specific criteria. For instance, you could search for products that generate over $5,000 in monthly revenue but have fewer than 100 reviews. That's how you spot a gap in the market.
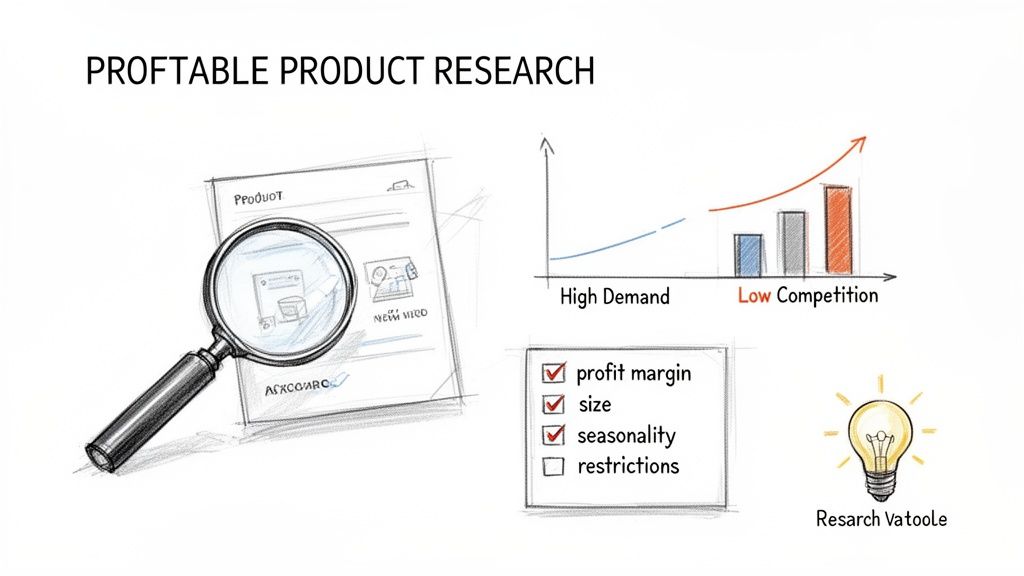
The Profitable Product Checklist
Once you've got a shortlist of potential products, you need to run them through a tough validation process. I rarely, if ever, move forward with a product unless it ticks most of these boxes.
A strong product candidate typically has:
- Consistent Demand: Look for things that sell steadily all year, not just during Christmas or summer. Sales history graphs in your research tool will show you if a product is seasonal.
- Low Competition: Check the average number of reviews for the top sellers on page one. If everyone has thousands of reviews, it’s going to be a long, expensive battle to get noticed.
- Healthy Profit Margins: A good rule of thumb is to find a product you can sell for at least 3-4 times your landed cost (your total cost to get one unit from the factory to an Amazon warehouse). This buffer is crucial for covering Amazon fees, ad spend, and still leaving you with a decent profit.
- Small & Lightweight: Amazon's FBA fees are based on size and weight. A small, light product means lower fulfillment and storage fees, which goes straight to your bottom line.
- Not in a Restricted Category: As a new seller, steer clear of anything fragile, electronic, or in a "gated" category like supplements or baby products. You can tackle those later once you've learned the ropes.
Key Takeaway: Don't fall in love with your product idea. Fall in love with the data. A boring product that makes money is infinitely better than an exciting one that collects dust and storage fees.
Think about it this way: a simple silicone baking mat is a much better first product than a complex drone. The mat is small, light, and unbreakable. The drone is large, fragile, electronic, and opens a can of worms with customer service and liability issues. Start simple, prove the concept with data, and then you can scale.
Finding and Vetting Your First Supplier
You’ve got a product idea that checks all the boxes—people want it, and you know you can make it better. That’s a huge win. But now comes the part where your idea leaves the spreadsheet and becomes a real, physical thing you can hold. This is where you find a supplier, and frankly, it's where a lot of new sellers stumble.
The goal isn't just to find a factory; it's to find a long-term partner. You need someone who can reliably produce your product to the quality you demand, on schedule, and at a price that actually leaves you with a profit. For most sellers starting out, that journey begins on a platform like Alibaba.
First Steps on a Sourcing Platform like Alibaba
Alibaba is the undisputed giant for sourcing products overseas. It’s essentially a massive B2B directory connecting you with thousands of factories that can make almost anything you can dream up. But it's a double-edged sword—the sheer number of options can be completely overwhelming.
The trick is to be methodical. Don’t just search for "yoga mat." Get super specific. Try something like "eco-friendly TPE yoga mat 6mm." The more precise your search query, the better you’ll filter out the noise and find manufacturers who actually specialize in what you want.
As you start browsing the results, keep an eye out for a few key details on a supplier’s profile:
- Years in Business: I rarely look at anyone who hasn't been on the platform for at least 3-5 years. Experience and a proven track record are good signs of stability.
- Gold & Verified Supplier Badges: These are paid badges, but they also mean the supplier has undergone some level of third-party verification. It's a basic check to ensure they're a legitimate, operating business.
- Response Rate: Look for a rate over 85-90%. A supplier who is slow to respond to initial inquiries is a major red flag for communication down the road.
I recommend building a shortlist of about 5-10 promising suppliers. Then, it’s time to reach out. Your first message should be professional and straight to the point. Introduce yourself, detail your product specifications, and ask clear questions about their materials, production capacity, and—critically—their Minimum Order Quantity (MOQ).
A Word of Caution: I've seen too many sellers get burned by this. Never, ever commit to a large production run based on emails and a few polished product photos. The next step is absolutely non-negotiable.
Ordering Samples: The Most Important Step
You have to get your hands on the product. Period. Order samples from your top 3-4 suppliers before you even think about placing a bulk order. This is the only way to genuinely gauge the quality, feel, and finish of what you'll be selling.
When those samples arrive, put them through the wringer. Compare them side-by-side. Better yet, buy your top competitor's product and compare your samples to that. Does the stitching feel solid? Is the material what you expected? Are there any small defects? This small investment in samples can literally save you from a multi-thousand-dollar mistake with inventory you can't sell.
Calculating Your True "Landed Cost"
Your profit isn't made when a customer buys your product on Amazon. It's made right now, before you've even placed your first big order. You absolutely must know your landed cost per unit—that’s the all-in cost to get one single unit from the factory floor into an Amazon fulfillment center.
New sellers often make the critical error of only looking at the factory price. Your true landed cost is a combination of a few different things:
- Unit Cost: The price per item you negotiate with the factory.
- Freight & Shipping: The cost to get your entire order from China (or wherever) to your home country.
- Import Duties & Tariffs: The taxes your government charges to bring the goods across the border. This can vary wildly depending on the product.
- Inspection & Prep Fees: You should always pay for a third-party inspection. You may also have costs to label or bag your items to meet Amazon's FBA requirements.
Let's say a factory quotes you $4 per unit. After adding up shipping ($1.50 per unit) and import duties ($0.50 per unit), your actual landed cost is $6. That $6 figure is the number you must use to calculate your profit margin, not the $4 factory price. Nailing this number down is the key to making sure your Amazon business is profitable from day one.
Creating a Product Listing That Converts
You’ve done the hard work of finding a product and locking down a supplier. Now for the fun part—this is where the sale is actually made. Think of your product listing as your digital storefront. It's your 24/7 salesperson and your most critical marketing asset, all in one. It’s what turns a casual browser into a loyal customer.
Building a listing that actually sells is a mix of art and science. You need the right keywords to get found by Amazon's algorithm, but you also need compelling copy that convinces a real person that your product is exactly what they need. Nailing this is non-negotiable if you want to succeed with Amazon FBA.
Crafting a Keyword-Rich Title
Your product title is the most valuable piece of real estate on your entire page. It carries the most weight with Amazon's A9 search algorithm and is often the first thing a shopper reads. Your goal is to strategically pack it with your most important keywords without it sounding like a jumbled mess.
A great title usually has a few key ingredients:
- Primary Keyword: The main phrase people are searching for.
- Brand Name: Start building that brand recognition from day one.
- Key Feature or Benefit: What’s its standout quality? Is it extra thick, organic, or designed for a specific purpose?
- Material or Quantity: Essential details like "Stainless Steel" or "Set of 4."
- Target Audience: Is it "for Toddlers" or "for Outdoor Camping"?
For instance, a beginner might just write "Silicone Spatula." An experienced seller knows better. A much stronger title would be something like: "BrandName Pro-Grade Silicone Spatula Set (4-Pack) - Heat Resistant Non-Stick Kitchen Utensils for Cooking & Baking." This version tells both Amazon and the customer everything they need to know at a glance.
Writing Bullet Points That Solve Problems
Those five bullet points under your title? That’s your sales pitch. A classic rookie mistake is to just list features. Here’s a reality check: customers don't buy features, they buy solutions to their problems. Your job is to translate every feature into a real-world benefit.
Don't just say: "Made of 100% Cotton."
Frame it as a solution: "Enjoy Breathable All-Night Comfort: Made from 100% premium cotton, our sheets naturally wick away moisture, keeping you cool and comfortable for a deeper, more restful sleep."
See the difference? The first is a boring fact. The second paints a picture and solves a common problem (waking up hot and sweaty). Figure out the top five pain points your product solves and dedicate a bullet point to each one, leading with the benefit.
Pro Tip: Capitalize the first few words of each bullet point to create a bold headline. This technique grabs the eye and lets scanners quickly absorb the main selling points.
The Power of Professional Imagery
On Amazon, your photos do all the heavy lifting. Customers can't touch or feel your product, so your images have to make them feel like they can. Grainy, poorly lit smartphone pictures will destroy trust in a heartbeat and send shoppers straight to your competitor's listing.
Investing in a professional product photographer isn't an optional expense; it's a must. A solid set of images should include:
- The Hero Image: Just your product on a pure white background. This is a strict Amazon rule, so don't skip it.
- Lifestyle Shots: Show your product in action. Help the customer visualize it in their own life.
- Infographics: Use slick graphics with text callouts to highlight key features, dimensions, or materials.
- Comparison Chart: Show how your product is superior to the competition.
Great visuals preemptively answer customer questions. And when you're thinking about how to make your page as effective as possible from day one, it helps to understand the strategies behind successful ASIN level product launches, which can really amplify the impact of your visual and written content.
Optimizing Your Backend Search Terms
Behind the scenes, there's a section in your listing called "Search Terms." This is your secret weapon. While customers never see these keywords, Amazon's A9 algorithm pays close attention to them.
This is where you can stuff all the relevant keywords that didn't quite fit or sound natural in your title and bullets. Think about synonyms, common misspellings, slang, and long-tail phrases. If you’re selling a "yoga mat," your backend terms could include things like "pilates mat," "exercise pad," or "non-slip workout floor cover."
Fire up a tool like Helium 10 or Semrush to find these hidden gems. These terms are invisible to shoppers but absolutely critical for connecting your product with a broader range of searches.
Shipping Your Inventory to Amazon FBA
Your product listing looks great, the keywords are dialed in, and you're ready to go live. Now for the final logistical step: getting your inventory into Amazon's warehouses. This is where the rubber meets the road, and unfortunately, it's a common stumbling block for new sellers who make expensive mistakes that can delay their launch for weeks.
Think of Amazon's fulfillment network as a highly precise, automated machine. Your inventory needs to arrive prepped and packaged in a very specific way to slide right into that system without a hiccup. Get it wrong, and you risk having your entire shipment rejected and sent back to you on your dime. That’s a momentum killer you want to avoid at all costs.
Understanding FBA Prep Requirements
Before your products can even be packed into a shipping box, each individual item has to be prepped according to Amazon's strict guidelines. These rules exist for a reason—they protect your products, Amazon's warehouse staff, and the integrity of the entire fulfillment process.
Here are the most common prep tasks you'll encounter:
- FNSKU Labeling: Every single unit needs its own FNSKU (Fulfillment Network Stock Keeping Unit) barcode. This is Amazon’s internal tracking code for your specific product. You’ll generate these labels inside Seller Central during the shipping plan creation, and you must stick one on each item, making sure to completely cover the original manufacturer's barcode.
- Poly-Bagging: If you're selling items that could get dusty, dirty, or have loose parts (like a plush toy or a t-shirt), they'll likely need to be sealed in a clear poly-bag. If the bag opening is 5 inches or wider, it legally requires a suffocation warning printed on it.
- Bubble Wrap: Selling anything fragile, like glass jars or ceramic mugs? It has to be wrapped securely in bubble wrap. The standard test is simple but effective: it must be able to survive a drop onto a hard surface without breaking.
These aren't just suggestions. I've seen sellers send in a shipment of glass candles without any bubble wrap, only to have the entire thing rejected at the warehouse door. That’s a painful and completely avoidable financial hit.
Creating Your First Shipping Plan
With your individual units all prepped and ready, it's time to log into Seller Central and create your shipping plan. This is where you formally tell Amazon what you’re sending them, how many units of each product, and how you've packed them into boxes. Based on this info, Amazon will tell you which fulfillment center(or centers) to send everything to.
Choosing to use FBA is a massive strategic advantage. In fact, over 82% of the 9.7 million sellers on Amazon use FBA to gain access to the coveted Prime badge and let Amazon handle the logistics. With Prime members driving the lion's share of sales, it's a no-brainer for most sellers. You can dig into more fascinating data like this in the full 2026 report on Amazon seller statistics.
As you get your products ready to ship, remember that it's all in service of your listing. This is what the customer sees.
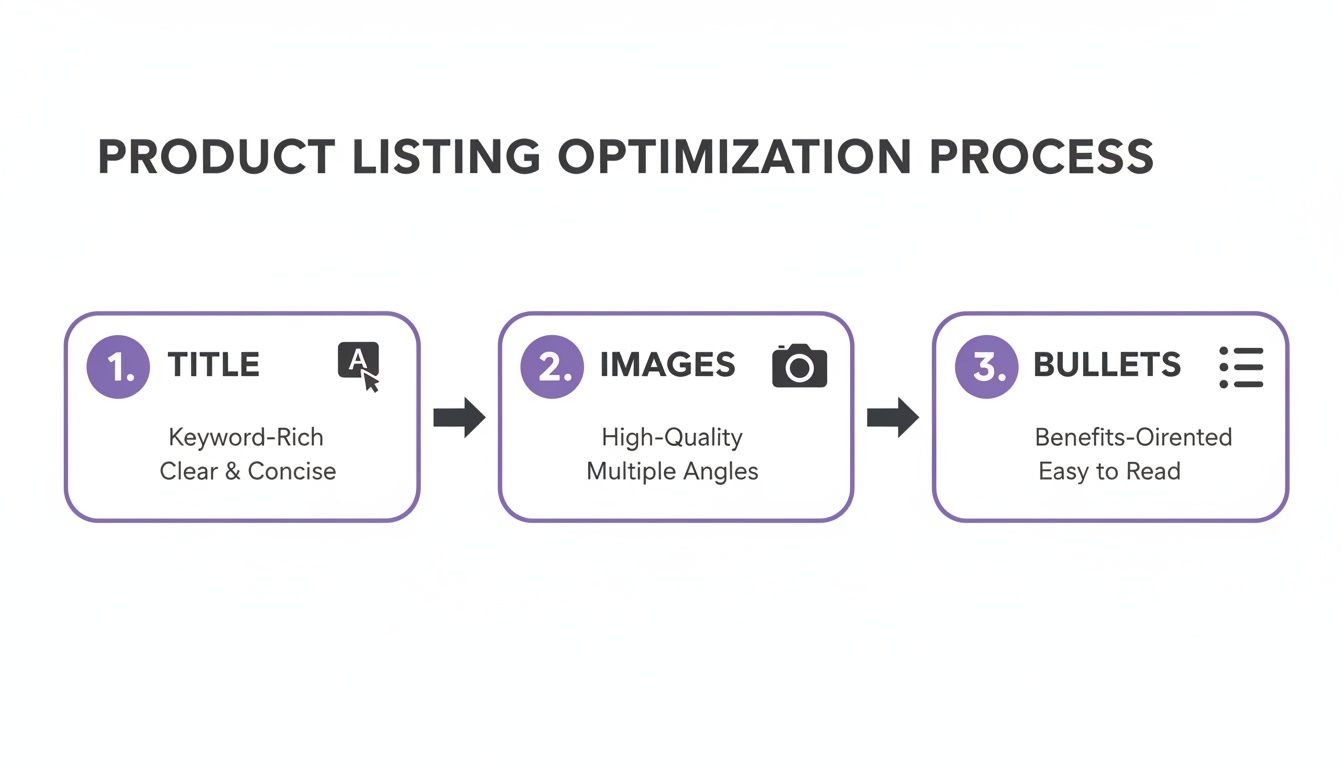
The flowchart above is a great reminder of how the key pieces of your listing—the title, images, and bullet points—all work together to convince a shopper to click "Add to Cart."
Choosing the Right Shipping Method
As you work through the shipping plan, you'll need to choose how to get your boxes to Amazon. For a new seller, it really boils down to two options.
- Small Parcel Delivery (SPD): This is the go-to for beginners. You're shipping individual boxes using standard carriers like UPS or FedEx. The huge benefit here is using the Amazon Partnered Carrier program. The shipping rates are deeply discounted and almost always cheaper than what you could get on your own.
- Less Than Truckload (LTL): If you're starting big and sending in a large volume of inventory (think over 150 lbs or a full pallet), LTL shipping is your most cost-effective bet. This involves scheduling a freight truck to pick up your palletized shipment.
Insider Tip: For your first few shipments, just stick with SPD and the Amazon Partnered Carrier program. It’s far simpler, the costs are clear, and it’s the easiest way to learn the process without getting tangled up in freight logistics.
Once you’ve locked in your shipping method, the system will generate the final box labels. These are critical—they tell the warehouse team exactly what’s inside each box and tie it back to your account and shipping plan. Slap those labels on correctly, schedule a pickup, and your inventory is officially on its way to being sold. Nailing this final step ensures your products get checked in quickly and your launch goes off without a hitch.
Your Top Amazon FBA Questions, Answered
Jumping into Amazon FBA is exciting, but let's be real—it can also feel completely overwhelming. You've probably got a dozen questions buzzing around your head about the money, the timeline, and all the things that could go wrong. I get it. Here are the straight-up answers to the questions I hear most often from people just starting out.
How Much Money Do I Really Need to Start?
Forget the "get rich quick with $500" hype. For a serious private label launch, you should realistically budget between $3,000 and $5,000. That might sound like a lot, but it’s what gives you a real shot at success instead of running out of cash halfway through.
Here’s a rough breakdown of where that money actually goes:
- Your First Inventory Run: This is the big one, usually eating up $1,500 - $2,500. It covers your first batch of products from the factory, what they call the Minimum Order Quantity (MOQ).
- Essential Software: Plan for about $100 - $200 to cover your first couple of months of a research tool like Helium 10 or Jungle Scout. Flying blind isn't an option.
- Business Basics: Put aside $100 - $500 for practicalities like setting up an LLC (highly recommended) and paying for your Professional Seller Account ($39.99/month).
- Launch & Advertising: You absolutely need to earmark $500 - $1,000 for your initial Pay-Per-Click (PPC) ad campaigns. This is how you get seen before you start ranking organically.
Sure, you could start with less if you're doing something like retail arbitrage, but for building a brand, this is a solid, practical starting point.
When Can I Expect My First Sale?
That first "cha-ching" notification is a feeling you'll never forget! If you follow a solid launch strategy, you can expect your first sale within one to two weeks after your inventory is checked in and available at Amazon’s fulfillment centers.
What gets you there faster? A killer listing with professional photos and copy that actually sells, for one. But the real key is an aggressive PPC ad campaign right out of the gate to force that initial traffic and tell Amazon's algorithm you're here to play.
What Are the Biggest Beginner Mistakes to Avoid?
I’ve seen new sellers make the same costly mistakes over and over. Just knowing what they are puts you way ahead of the curve.
Watch out for these classic blunders:
- Falling for a "Passion Product": Don't sell something just because you think it's a great idea. Sell what the data shows customers are already searching for and buying. Let the market guide you.
- Skipping Product Samples: I can't stress this enough. Never, ever place a bulk order without getting and testing physical samples from a few different suppliers. This is your single most important quality control step.
- Ignoring Landed Costs: Your true cost isn't just the price per unit from the factory. You have to factor in shipping, customs duties, and FBA prep fees. Forgetting these will absolutely wreck your profit margins.
The #1 killer of new brands? Pouring every last dollar into inventory and leaving nothing for advertising. Your product could be amazing, but if you have no budget for PPC, it's just going to sit there, invisible on page 10 of the search results.
Is Selling on Amazon FBA Still Worth It?
It's a fair question. The platform is more competitive than it was five years ago, no doubt. But is it still a massive opportunity? Absolutely. You just have to be smarter about it.
The numbers are still incredibly encouraging. Recent data shows that 86% of Amazon sellers are profitable, and around 58% hit profitability within their very first year. You can dig into more Amazon seller profitability stats on forceget.com.
The "gold rush" days might be over, but for entrepreneurs who treat this like a real business—focusing on data, building a brand, and creating value—the opportunity is as big as ever.
Ready to slash your software costs and streamline your e-commerce operations? EcomEfficiency bundles over 50 premium tools for product research, advertising, and SEO into one simple subscription, saving you up to 99% on monthly fees. Stop juggling expensive accounts and start working smarter at https://ecomefficiency.com.